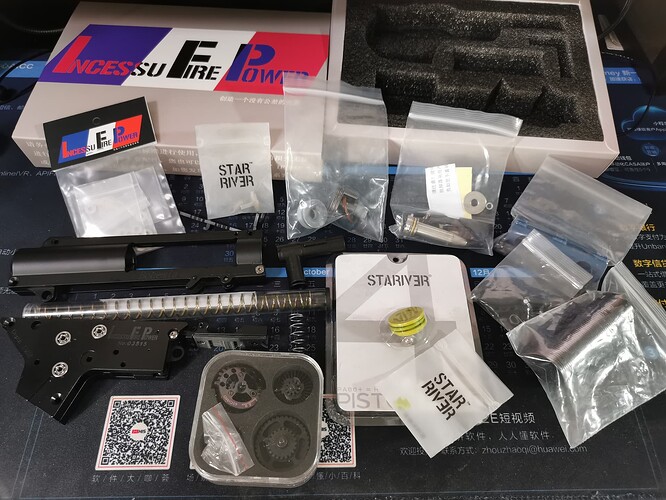
Alright guys, going to start my first build, hopefully I don’t cook this up. Will be updating this thread as regularly as I can with progress and probably a lot of questions. Thanks in advance to everyone that answers my questions.
Ah, nothing like a pile of upgrade parts to bring a smile to your face. ![]()
Go for it, man… have fun ![]()
Cocking it up is half the fun!
Gotta make mistakes to gain an education ![]()
@AKgelblaster has a fair bit of inside knowledge on this brand/model, and I’m sure she would be happy to help along the way if required ![]()
Yea actually I am very eager to see the final build from @Martin. I know some people in HK modded the AS version using the stariver stuff.
@Martin Were the gears set short stroked ?
Thanks! and yes, part of the fun is building it, so I’m def enjoying the process.
What is the AS version?
No the gears are stock 16:1 ratio right now, you think I need to cut teeth off? Spring is M80
Thanks!
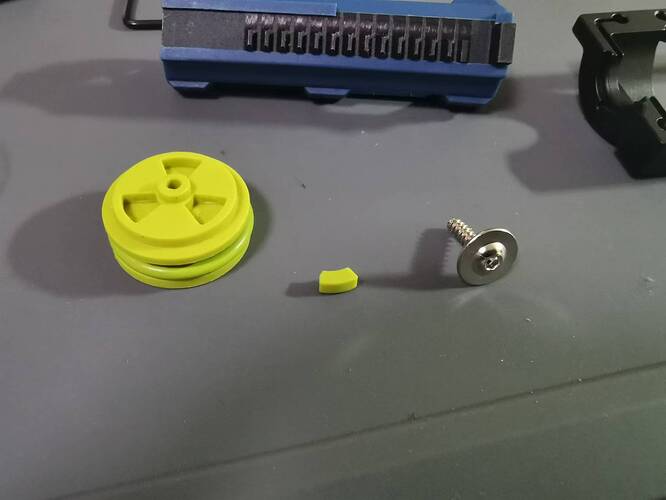
I would guess it is to fit in the hole, maybe to fill in the space between the rack and piston head. Odd design choice to have space between the piston and head. Guessing they are going for weight reduction?
You’re right, asked a friend who said it’s a bit of a dated piece of accessory to stop the head from spinning, but it’s basically made obsolete with all the modern stuff coming out.
Just ordered one of these cant wait to get it
So bit of an update on my progress. I think I’ve shimmed my gears correctly. My first time shimming them they would make a weird noise whenever I turned them to the right. I think it’s from the spur and sector gear rubbing together. Reshimmed and now no grindy sounds at all. I tried to remove the metal contacts for the mag, but in doing so got a nice little slice across my finger. Ordered a pair of decent pliers and spare contacts. Lesson learned.
Managed to remove the mosfet from my old gearbox and screw it down, but noticing a bit of wobble. Is this going to be a problem?
Finally got the contacts and managed to solder a bit of the wire off, so had to ask a friend for some extra cable, soldered those on and now should be fine. Put the whole thing together and realized I didn’t even put the main spring in. Complete pain in the ass. Then realized I forgot to put in the anti reverse latch. Then the tappet plate spring. I’m getting really good at opening and closing the gearbox now.
Finally the bit I’ve been dreading. The gearbox doesn’t fit into the SLR receiver. I can’t get the main pins in at this position. I’ll have to grind a bit off the back, where the buffer tube screws in. Wish me luck guys.
Oh and I also spent a good amount of time figuring out how to install the sector delay, that was a real head scratcher.
Oh and the Oring for some reason didn’t seal, so I just took the Oring from my previous gearbox and put that in, tight as a snare drum.
Think we’ve all done that at some point… you pull the trigger and… what the hell? ![]()
Best way to learn is by iteration, matey. You’ll be that much more experienced by the end of this.
Good on ya for getting stuck into it. ![]()
Great work that will only get better with time and practice ![]()
![]()
Well done, always good to see someone having a go and learning!
We have all been there. Blaster together, then find a thing that gets it all apart again… and again!
Some shimming tutorials on the internet say the gears have to be closer together than they really need to be. If you have 70% of teeth contact I call that minimum. You really don’t want them to be so close you can only just see light between them as in time with a bit of wear that gap will get closer. You want a bit of room for wear and change over time. Long as they aren’t rubbing is all you really need.
I wouldn’t use the sector delay, generally no need for them in gel gearboxes. It is in there so see how it goes but if you have seal issues it would be the first thing I would remove.
Those LDX and their clones normally fit in SLR receivers, are you able to get some pictures to help understand what isn’t fitting?
Yeah, been a lot of stuffing everything in, snapping the gearbox shut, sigh of relief, checking everything (oh my god it spins), and then realize I missed something, start cursing and open it all up again. I put a small dab of loctite on the anti reverse latch spring to keep it in place and it seems to have worked really well. Also a small dab of loctite on the safety switch spring which has also worked. Also bent the trigger spring a little to make it sit and not want to jump up all the time.
Hmm… from what I’ve seen there’s the bevel and pinion method and the spur method. I went with the bevel pinion method since I heard it’s a bit more time consuming but better… not sure if that’s true. I guess it’s pretty good, I added shims till they spin freely and another 0.1 makes them slow, and I remove the last 0.1. The problem being it’s 16:1 ratio gears and a brushless 40k Solink so I’m scared that if the gears are not shimmed well, it’s going to die real fast.
The sector delay is for the high rate of fire and was recommended by a tech that I trust. I’ll remove it if I get feeding issues but he said I’m probably looking at 40 rps so I should need the sector delay.
Yeah pretty sure the gearbox doesn’t fit, as I cannot get the takedown pin holes to line up at all. It’s a small bit in the back that is cramped up against the place where the buffer tube screws in. Pretty common issue from what I’ve seen on the forums, just a bit of grinding and it should fit. If I fuck it up then I have a good excuse to buy the new 300 RMB nylon receiver from LDT lol.
Quick question: I think because of my mosfet, the sector gear always rotates so that the teeth end up pointing up. This becomes a problem when I try to put in the upper part of the gearbox because it pushes against the piston. I’ve managed to get around this by putting it in single shot and clacking off one shot to get it in, but I’m guessing this is a fucking bad idea to keep on doing. What’s the proper way to get the upper gearbox on the lower? And how do they stay together in the receiver? A bit confused on this part.
My experience with 40k motors and 16:1 is about 30rps, which is fast but not ridiculous. Also not a difficult build to get running but a little finesse needed for reliable feeding and consistent fps.
Bevel to pinion is the most accurate and best reliable results method. Starting with the spur is more something I’d do if the gearbox is a known quantity you have experience working with.
I can say I would absolutely remove the sector delay. With higher rps you want the tappet back forward as fast as possible. Normally I will cut the tail off the tappet plate so it just clears the shaft of the sector gear. Also removing loops from return spring and or using a strong return spring.
A delayer will only make sealing in auto much harder. Different for Airsoft.
If your mosfet has settings for active brake and pre cocking you could play with them to help with sector location.
The split gearbox upper should be held in by the rear receiver pin, and the buffer tube screw.
Thanks man I’ll keep that in mind. Fire selector is arriving today so I should be able to finally put it together and see how it feeds. Any problems first thing is removing the delay.
Return spring is one of the hardest since I’ve had bad luck with the cheap ones - they just keep breaking on me, and since the good ones are like 3 RMB each I just got 10 of them.
Yeah the mosfet is supposed to be “good” but I haven’t messed around with it yet. I’ll see what I can do.
What’s a buffer tube spring? From what I can see that’s only for real steel?
The trick with return springs is to cut off the end loops where the wire makes a 90⁰ bend at the loop.
Reshape new loops onto the ends with a set of needle nose pliers, making sure that the new loops are inline with the spring wire.
Springs always break at that 90⁰ kink in the wire, so by reshaping to eliminate those stress points, springs will last a very long time ![]()
You can even use the standard springs, as by cutting and reshaping you are technically shortening the spring and adding extra tension to it at the same time ![]()
wait WHAT? my mind is getting blown right now. You got a video or photo? Thanks so much!
I’m technologically retarded when it comes to making videos, and don’t have any springs on hand to take pictures of… but I’m sure that a man of your talents should be able to figure it out from the advice above ![]()
At least you have 10 spare springs to practise on ![]()
If you do run into difficulties, I could find a spring and take some pics, unfortunately I’m not at home today, but will try post something later tonight/tomorrow.
Sorry screw not spring. Buffer tube screw.
Edited to not confuse anyone again.

