Good thing I kept the old 18:1 gears out of the SLRs so I can practice destroying those too ![]()
Why not, I fixed a few things and broke some today. Came out on top at the end ![]()
![]()
As @RokSolid and everyone else who has ever fitted aftermarket bushes/bearings/gear sets knows………. there’s absolutely NO standard tolerances in the Gelblaster hobby!
That’s why I always had SO many different brands and breeds of parts in my inventory, because it always came down to mixing and matching whatever worked for every single build.
You could have two exactly the same brand/model Gelblasters, and yet parts that fitted in one would not work in the other!![]()
Every single build is a challenge and there’s no such thing as having a standard “parts list” for any identical blaster project.
Just gotta keep mixing and matching whatever works for whatever you are working on at the time. ![]()
1 Like
Way too true. So many builds that were meant to be “rinse and repeat” have ended with a different set of parts just because something didn’t line up, sit as it’s meant to, or move as intended.
The tolerances and spec are wank, non existent.
At best everything is in a ball park but not always!
Well that little experiment is over. Cracked the gearbox while radiusing the corners. Obviously the Dremel bit was too much for it, or I was too ham fisted.
Before

After

Back to the drawing board ![]()
Oh bugger. Mmm a dremel tool might have been bit much. But to crack it like that did the burr cutter bind up, you gotta watch out for those buggers.
I just use a small medium round file that is the diameter of the radius you want. Doesn’t take long as only ally. Guess I should of mentioned it before. Ooops
I poke away with this ole rat.

Needle files too, but can’t be arsed taking a pic as they down the shed 50m away lol
Yep, round needle file does the job nicely for me.![]()
Gotta say, hard to believe any kind of Dremel point would cause that shell to crack like that. My guess would be it was already half way to cracking before you even started and it was not visible. Obviously a very weak design (insufficient material) at a particularly high stress area.
Even if you’d managed to radius that conrner with a file with no evident cracking, if taking a Dremel to it can cause a failure like that it wouldn’t have stood up to the stresses a piston slapping into it would have subjected it to.
Probably a good thing it happened when it did and not when it was fully loaded and in a blaster.
You can’t fight physics. ![]()
CYMA full metal V2 gearboxes all the way! ![]()
1 Like
That sucks @Jug
I normally just use a needle / rats tail file. The metal is soft enough I can do all four corners of both halves in a few minutes. Actually cleaning the grease before and filings after takes me longer!
Well… if you want a solid LDX box that is already radiused I know a guy lol
The 9mm bearings have stood well so far in some pretty crazy builds of mine and other techs. And pre casted radius… much more meat where it matters.
I never rated the old cast ldx highly. Seen to many fail. And I would normally say it’s better to use short stroking, light pistons, good seals with correct volume and aoe padding than radiusing them, they just didn’t have enough material to actually survive long with decent springs.
There are AliExpress sellers etc that have just the top of old ldx, but many are always sold out.
Thanks for the replies. That’s the second part I’ve screwed up using power tools instead of hand tools ![]() Stupidly I have a needle file that could’ve been used, never would have guessed that a Dremel tool would do that so my bad. Maybe the box had suffered some stress when the bearing let go, and when the sector teeth broke its teeth off.
Stupidly I have a needle file that could’ve been used, never would have guessed that a Dremel tool would do that so my bad. Maybe the box had suffered some stress when the bearing let go, and when the sector teeth broke its teeth off.
With the https://akgelblasterau.com/products/ldt-ldx-gen3-0-advanced-v2-gearbox-housing?_pos=4&_sid=731dc1011&_ss=r box, assume all the bits I already have would swap straight over?
Pretty much they do. The piston runners are a bit tighter, give me a ring I have a t238 piston that fits well. The only other clearance issue is the tappet plate is a little tighter but a light sand or file sorts that out too.
All due to more meat in the gearbox, so the juice is worth the squeeze. I’ve run mine (was in a video) with all springs from stock to m140 and full stroke doing 24 rps, has since lived with a m100 and hasn’t missed a beat. So I’d say they are a good bit meatier where it matters!
And don’t worry, my first radius job I used a Dremel, and went way to far too fast as I really underestimated how soft the metal was!
1 Like
Just to clarify, that’s a light sand or file? ![]()


Jeez… only posted it yesterday arvo!
Joys of living near the main mail centre of the region!
Looking forward to seeing how it turns out!
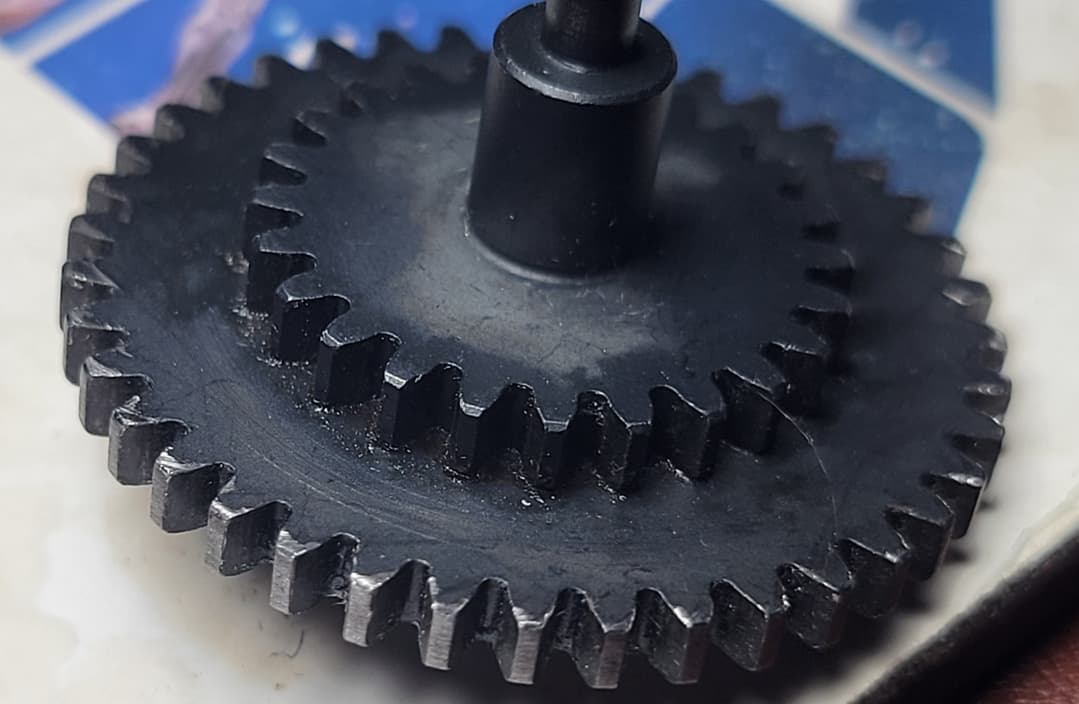
With the trauma the 13:1 gears have been through I was wondering if I should replace them to be safe?
The bevel gear has some small burrs on the gears that I could sort out with a 9 inch g… er, needle file

Spur gear also coped some heat for such a short stint in a box
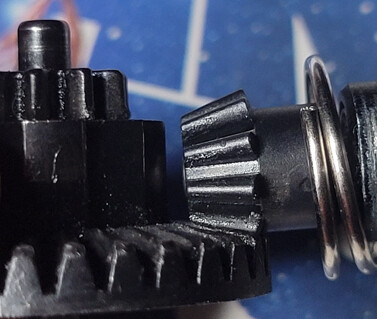
On another note, is this pretty much where to aim for motor height?
I’m a bit of a tightarse so… I wouldn’t bin those gears just yet. ![]()
Looking at where the scuffing is though, looks like the pinion height’s a bit off, like the pinion’s bottoming out on the crown gear and the crown’s rubbing on the bottom of the gear teeth. ![]()
With your pinion height as shown, full tooth engagement is best, but if the depth of tooth on the pinion is substantially shallower, full engagement may account for that top scuffing.
But I could be way off so best to defer again to the resident shimming guru on this one ( @RokSolid ) I’d be inclined to pull that pionion back a smidge though to guarantee it’s load bearing on the side of the geartooth with clearance between the top of the crown gear teeth and the bottom of the pinion.
1 Like
Thanks mate, it’s worth noting that this is a new pinion gear, the previous one was a much chunkier azreals perfect pinion which I wasn’t sure about so replaced
Line these up ideally…
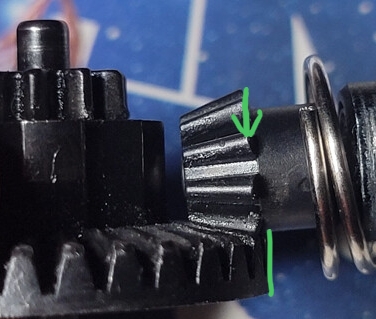
As @Friendly_Fire says, if be pulling the pinion out a bit… the end of the teeth goes to the edge of the bevel. You get maximum mechanical advantage out of the edge, and the teeth are designed to mesh there.
Of course depth matters… but equally so do how close the gears are, and judging the wear it looks like it’s motor height a bit deep, the bevel height is probably bob on.
Should you get new gears? I would send it as is.
Spur gear will likely be fine, you’d be surprised.
They are tough, the paint missing makes it look worse than it is, they will still work.
You’ve got the gears already, give em a try.
Worst case, can always get a new bevel gear, but if it was my personal blaster I would send it.
1 Like
Also need to pay attention to possibly needing to shim the AR Latch along with the gear heights.
It’s something commonly overlooked and forgotten, but the wear pattern on the inner teeth of your bevel gear looks to me like a classic case of it rubbing on the AR Latch. ![]()
Shim the AR higher and see how much quieter and smoother it runs! ![]()