If you are grading gels with sieves then gels should be fine. If you have feeding issues it is not gel size.
1 Like
Did some testing this morning, my GE , HATES u/elites, 1 hr 15 mins, wouldn’t feed and smash them , loved x force black labels 2.5 hr grow , I use sniper gas , lock back on empty, so Iam now growing w/ pearls , one 2hrs , the other 2.5 hrs , almost sent it back again .
1 Like
Hi , my ge , loved the pearls 2 hr grow , playing with the hop up , 20 mts shooting to the left , so iam try to move the hopup to the right a bit to straighten it out , I wonder how a hellfire would work [ means a longer barrel ] well I’ll keep experimenting, and with the lock back I’ve seen on utube a dab of apoxey on the lock back arm to add a bit of hight for better lock back.
So the GE’s (multiple retailers) and the GM MWS (CEH only) are the only GBBRs currently available?
Others are all either announced or pre-orders?
The hopup on mine was perfect out of the box. If you’re shooting in wind that could cause it to shoot to one direction.
What you can do to counteract that is tilt your blaster into the direction the wind is coming from.
1 Like
Wrench arrived - it’s done! Here’s my attempt at an M110 from an M16A3.
Daniel Defense Mk18 12 inch handguard, rail covers from the MC6604RISM model and changed the default pistol grip to a GFG Mod 0 from X-force.
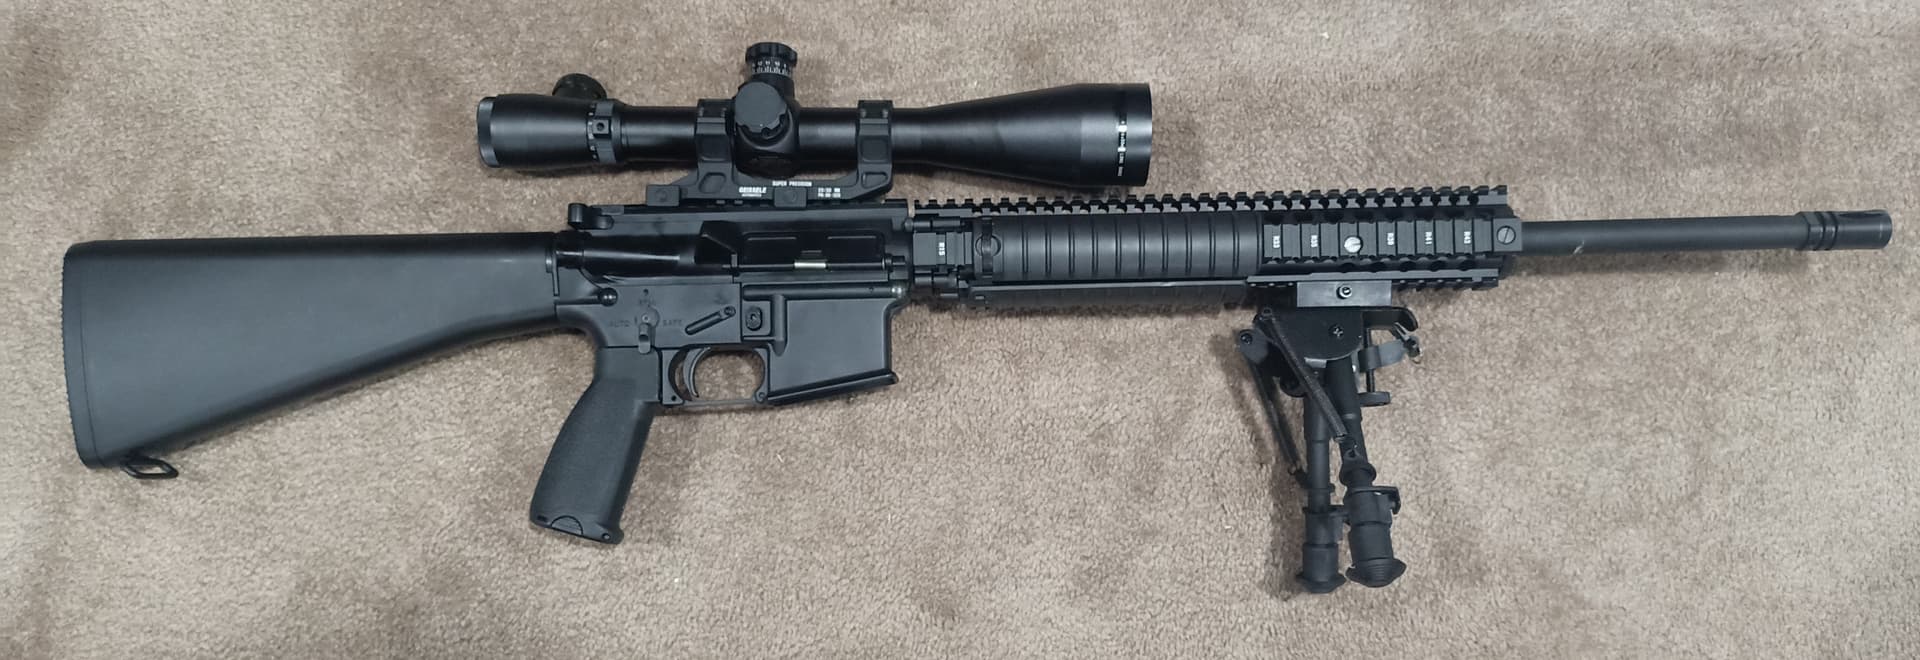
Triangle front sight removal was relatively simple - except for the punch pin for sling ring, that one was a real bastard. Had to work the entire sight for around 15 minutes before it became loose enough off the 2 grooves/gashes on the out barrel.
Thought the handguard was like the real steel equivalent and tried to take the end part off - didn’t need to as it just screws on (well couldn’t would be a better word, the 2 bolts facing the other way does not comes off). Bit of a chore figuring out how much spacers I needed so it’ll screw on straight at the end tightly. Couldn’t put back one of the bolt because the dust cover mount was blocking it.
The new grip, whilst more comfortable, does have a slight wobble when affixed.
Thanks guys for all your help! So happy how this turned out - most importantly I don’t need to day dream about other sniper/DMR blasters anymore.
8 Likes
Nice work mate. Washer under the bolt head will sort the grip wobble.
2 Likes
Pay plenty of attention to the long handguard/barrel from receiver all the way through the whole length.
Adding a long metal picatinny rail from the top of the receiver through to the top of the handguard, bridging the connection between the two main parts makes a very solid setup ![]()
Pay particular attention to using a heavy barrel/t-piece adapter spring and add tape/o-rings etc. along the length of the outer and inner barrels to stabilise within the handguard.
As long as everything is firm and solid, should be a good performer ![]()
![]()
2 Likes
Definitely trying to figure something out to reinforce a bit more - as you can see the rail and the handguard is not flush against the receiver itself, nor is it 100% aligned and probably just degree or two off rotation. Challenge now is to find something that’ll line up on the top rails to connect it both - maybe an offset rail mount? Gonna try something this evening.
2 Likes
Were you at mate?
I’ve got a lot of experience with fitting DD handguards if you want a hand.
My first guess is you used the 2 steel spacers for the barrel. You will need to ditch them and use micro spacers if required.
Essentially to fit a DD RIS II you remove barrel nut and spacers. Insert the hand guard brace with the alignment tines on either side of the receiver just below the picatinny. Install barrel nut. Ensure barrel tight and no wobble. If wobble insert microspacers below barrel nut until tight.
Once barrel is tight slide the handguard over and ensure the picatinny touches the receiver picatinny. Instal retaining bolt but don’t tighten. You need to loosely tighten the bolts make sure the handguard installs straight. Once the slack is out of the bolts and it’s all straight then tighten the bolts carefully spreading the work so you don’t misalign the hand guard. Once tighten then install the lower handguard picatinny.
All this needs to be done with the upper receiver off the lower receiver.
5 Likes
I’m on the Goldy - thanks for the offer but I’ll figure it out ![]() … or get obsessed enough my wife has to put her foot down.
… or get obsessed enough my wife has to put her foot down.
4 Likes
Check my edit mate.
Instructions are in there.
You do not need to install anything else to align it just needs to be installed correctly.
Let me know if you need a hand.
3 Likes
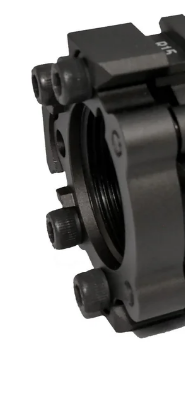
The brace doesn’t come off as its not a 1 to 1 replication of the real thing - the brace end is just threaded so the entire 12 inch handguard just screws on in place of the actual barrel nut.
I probably tested every conceivable combination of spacers on hand and right now the barrel and the handguard is tight, the handguard is 98% aligned with no wobble.
The whole 1 piece thing threw me in for a loop as I was expecting the brace end to come off too.
2 Likes
Oh
Is that the standard handguard??
1 Like
It’s this one - Daniel Defense MK18 Handguard 12" Black – WAT INT
Weird right? The default one was the plastic M16 one that came as a two piece fitted onto the delta ring.
The one in the picture has lugs on the brace.
It would be impossible to instal if it was part of the barrel nut.
Are you positive it’s not separate?
I mean Wats stuff is normally top shelf and 1 is to 1.
The one in the picture looks like every dd ris ii I’ve installed before.
Oh I tried - the 4 forward facing screws came off no problem, but its the 2 backwards hex screws that’s blocked by the handguard itself. Not at home right now but even from WAT’s photos you can see the brace has the threads to be screwed on.
1 Like
Ok.
That’s actually the barrel nut not the brace.
Have you installed a dd handguard before?
You have to remove the lower picatinny first.
So all the side screws along the handguard need to be removed first on both sides. The flat screw driver ones. The lower picatinny removed.
The lower two retaining bolts removed. The you can remove the brace and the barrel nut. Then Instal brace. Then instal barrel nut. Then handguard. Then retaining bolts. Last piece to instal is the lower picatinny.
1 Like
Haha definitely no experience at all - let me have another go tonight to make it better! Thanks for explaining it clearly ![]()
1 Like
No probs mate
They are a pain for someone that hasn’t installed them before as most people don’t know how to remove the lower bolts.
Lower picatinny is always the first part to be removed and the last part to be installed.
2 Likes